DOCS / GrandMA2 / Setup Timecode
Synchronization

Connecting to GrandMA2

Complete guide to setting up timecode (MTC and SMPTE) for perfect show synchronization.

01. Method Selection

Synchronization Protocols

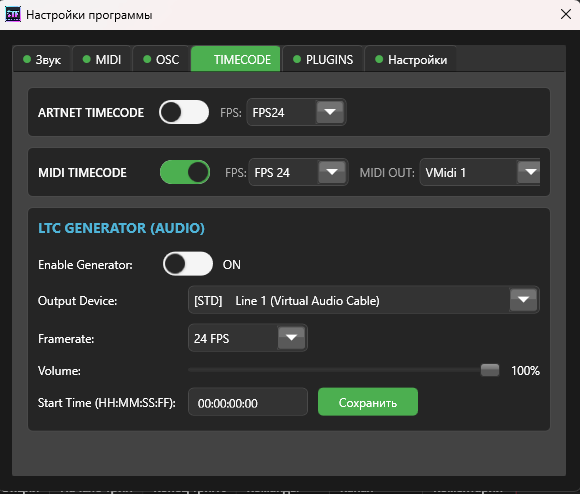
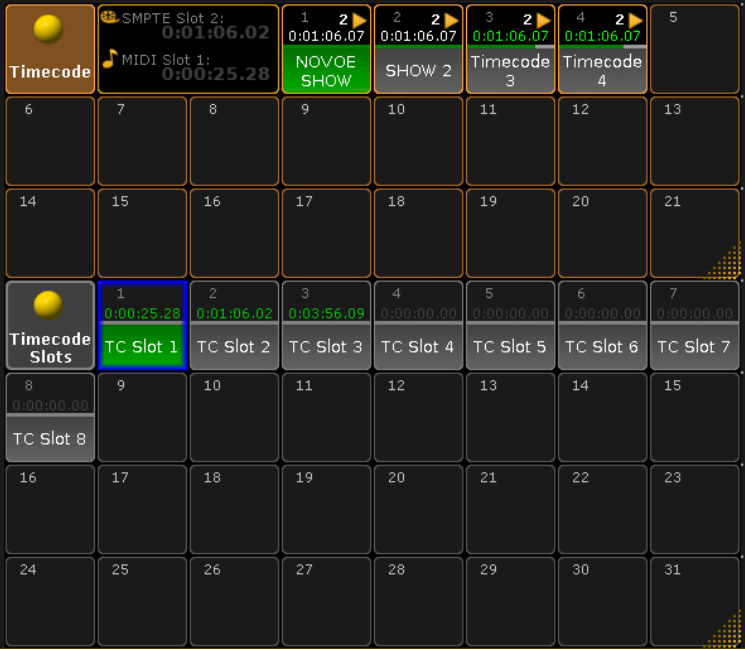
ShowTimePlayer supports two industry standards for timecode transmission. The choice depends on your current hardware configuration.
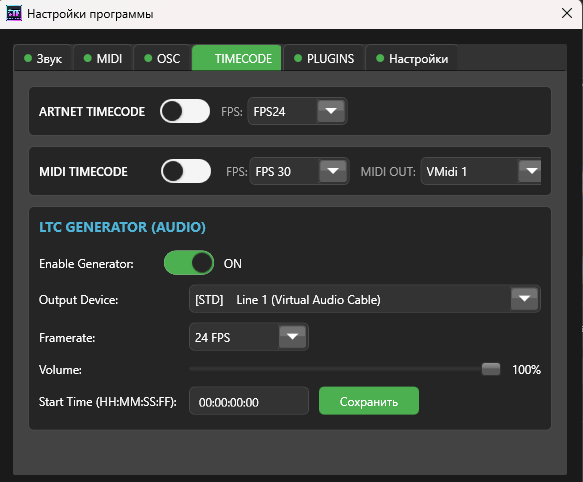
MTC (MIDI Timecode)

Ideal for single computer (onPC) or local network setups.

  • Requires: Virtual MIDI driver (e.g. loopMIDI).
  • Pro: Digital precision, no physical cables required.

SMPTE (LTC)

Standard for connecting to physical consoles via analog audio signal.

  • Requires: Audio interface output + XLR cable.
  • Pro: High reliability and long transmission distance.
02. Player Setup

Configuring ShowTimePlayer

Let's start by configuring the timecode output signal from the player.

  • Timecode Tab Open the program Settings and navigate to the Timecode tab.
  • Activation & FPS Enable **MIDI TIMECODE**. Crucially, select the **FPS** (e.g., 30). Remember this number; it must match the console settings exactly.
  • Port Selection In the **MIDI OUT** field, select your virtual port (e.g., loopMIDI). Click "Save".
Important Check Ensure the **TIMECODE** icon in the main player window is lit (active). If it is grey, click to enable it (see Fig 2).
Timecode Settings
Fig 1. Enabling MTC and selecting FPS
Timecode Indicator
Fig 2. Active status indicator
03. Input Signal

GrandMA2 Network Configuration

Now we must tell the console where to expect the incoming signal.

  • Network Menu Press the **SETUP** button on the console and select **MA Network Configuration**.
  • Console Selection Go to the **onPC** tab (or Consoles if using physical hardware). Find your station in the list.
  • Slot Assignment Find the **MIDI TC** column. Click the cell corresponding to your device and select **TC Slot 1**.
Setup Menu
Fig 3. Network Configuration Menu
MIDI Slot Assignment
Fig 4. Binding MIDI Input to Slot 1
04. Pool Objects

Creating Timecode Pools

We need visual timecode objects to manage the synchronization.

  • Creating Windows Create two empty pool windows: **Timecode Slots** and **Timecode Pool**. You will see that Slot 1 is now active (green indicator).
  • FPS Sync (Critical!) Right-click (Edit) on **TC Slot 1**. In the settings, set the **Frame Rate** exactly the same as in the player (e.g., 30 FPS).
Why is this important? If the FPS in the Player and the Console do not match, the timecode will drift and lose synchronization over time.
Pools Created
Fig 5. Created Timecode Pools
FPS Settings
Fig 6. Setting Frame Rate in the Slot
05. Show Assignment

Activating Timecode in Sequence

The final step is to assign our configured slot to control a specific Sequence (Cue List).

  • Sequence Settings Open your Sequence window. Click the clock icon (or "Link Selected" text) in the window header.
  • Slot Selection Select **TC Slot 1** from the dropdown list. This sequence is now listening to external timecode.
Slot Assignment
Video: Assigning Timecode to a Sequence
Verification

Final Check

Start playback in ShowTimePlayer. The time in the console should run in perfect sync with the player.

Successful Test
Video: Successful Synchronization!
Alternative

Connection via SMPTE (LTC)

The process is identical, except for the physical connection source.

  • Player: Settings -> Audio -> LTC Generator (select a separate audio output channel).
  • Cabling: Connect XLR cable to the LTC IN port on the console.
  • Console: In Network Configuration select the slot in the **SMPTE TC** column.
  • Object: In Timecode Pool settings select Source: SMPTE.
LTC Schema
Audio Signal Routing Schema